The Cash forecasting > Daily treasury > Forecast management > Import transactions menu enables you to import into Iziago forecast transactions exported from Excel or your ERP in the CSV format.
CSV stands for "comma-separated values". This is a format enabling you to move spreadsheet data from a program (Excel, ERP) to another (in this case, Iziago). When you save a file in the CSV format, data is automatically structured using a comma (or a tab) to separate fields. This separation system enables programs to identify the end of a cell and the beginning of the following one.
Example
You need to import the following transactions:
| Booking date |
Value date |
Amount |
Transaction code |
| 10/16/2017 |
10/16/2017 |
-8547 |
TAXES |
| 10/17/2017 |
10/17/2017 |
12055.46 |
RDTR |
| 10/19/2017 |
10/19/2017 |
549645.21 |
RDTR |
| 10/24/2017 |
10/24/2017 |
523.69 |
RDTR |
Your file will look like the following:

- The booking date of the transaction (column A) is in the first position
- The value date of the transaction (column B) is in the second position
- The amount of transaction (column C) is in the third position
- The transaction code (column D) is in the fourth position
If you are using an Excel file (like in this example), you must convert it into a .txt or .csv file to make it compatible with Iziago:
- Click on Save As in your Excel file.
- In the Save as type drop-down list, select Text (Tab delimited) (*.txt) or CSV (Comma delimited) (*.csv).
- Click on Save.
Now your file is ready to be imported into Iziago.
Importing transactions
- Select Cash forecasting > Daily treasury > Forecast management > Import transactions.
- Click in the File to import field and select the file you wish to import. New fields are displayed.
- In the Format name field, you can:
- Select the importation format to be used. To modify the format, refer to Edit importation format.
- Enter the name of the format if this is your first importation format.
- In the File format parameters section, indicate:
- If your file contains a header.
- The used field delimiter.
- If your file contains a text qualifier. Otherwise, select Other.
- If the Account value is contained in the file. Otherwise, select the relevant account from the drop-down list. If several accounts are concerned by the forecasts, add an "Account" column to your file.
- Click on View before import.
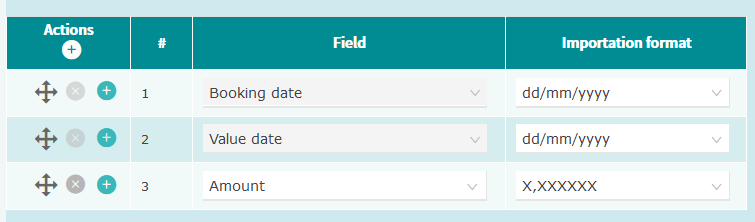
- In the File structure section:
- Select the fields of Iziago that correspond to the columns of your file.
- Select the importation format of each field (when required).
- Arrange the lines so that they match the order of the columns of your file:
- Click on to delete a line.
- Click on to add a line.
- Drag and drop the icon to arrange the lines in the order of your choice.
- Click on Import. The importation format is automatically saved. Once the importation completed, Iziago displays a report detailing the number of successful, failed and ignored transactions. You can export the report in PDF format by clicking on .
You can find the imported transactions in the Searching and modifying transactions screen.
Prerequisite: To create, edit or delete an importation format, you must have a file with a separator containing forecasts to import into Iziago.
To create your first importation format, refer to Importing transactions. To create a new format:
- Select Cash forecasting > Daily treasury > Forecast management > Import transactions.
- Click in the File to import field and select the file you wish to import. New fields are displayed.
- In the Format field, click on + New. The Add new format screen is displayed.
- Define the format settings of your file:
- Format name
- Use the checkbox to indicate if the text file with separator contains headers.
- Field delimiter: Indicate which character determines the end of a field and the beginning of the next one.
- Text qualifier: If each field is surrounded by a character to be ignored during the importation, indicate what is this character.
- The field Account: Specify whether the value Account is part of the imported data. Otherwise, select the account from the drop-down list.
- Indicate the parameters of the file structure, that is the information contained in the text file with separator and in which order the information is presented. This enables the information to be mapped into Iziago fields. Use the buttons in the Actions columns to add/remove lines in the table or change their order.
Click to enlarge
- Click on Save.
- Select Cash forecasting > Daily treasury > Forecast management > Import transactions.
- Select a file to import.
- From the Format drop-down list, select the format you wish to edit.
- Edit the desired data. For information on each field and section, refer to Creating an importation format.
- Click on Import. Your forecasts are imported into Iziago and your modifications are saved.
- Select Cash forecasting > Daily treasury > Forecast management > Import transactions.
- Select a file to import.
- From the Format drop-down list, select the format you wish to delete.
- Click on next to the Format field.
- In the Delete importation format window, click on Delete.
Displaying importation reports
The Importation history screen is made of a search panel at the top of the screen, and a result table which is displayed only if there exists at least one report which corresponds to the search criteria; otherwise, the message “No existing report” is displayed.
- Select Cash forecasting > Daily treasury > Forecast management > Import transactions.
- Click on Importation history at the top of the screen.
- Select the desired year and month in the search panel.
- In the result table, you can see the following information regarding the listed reports: Importation date, user that imported the file, file name, number of forecasts contained in the file, importation duration, number of forecasts successfully imported, number of forecasts whose importation has failed, and number of ignored lines (empty lines for example are ignored).
- If you wish, you may:
- Export as PDF the information of a report. To do so, click on on the appropriate line.
- Click on a line to display the report into the Importation report screen.
Note: The Importation report screen is also automatically displayed after each importation.